Is Oracle MapViewer a Fit for Me?

Recently I began evaluating Oracle MapViewer to determine if it is the right tool for me. I’m looking for a mapping API that will allow me to manage vector graphics, points and polylines, independently from the base map. Today, I write too much repetitive code for map providers like Google Maps and OSM.  Oracle MapViewer it is a good tool for people working in a Java EE environment. It also has a place as part of Oracle’s Business Intelligence Suite, and is a very handy ad-hoc spatial data viewer, but does it belong in my website development toolbox?

current_map_stackMy personal preference is open source and lightweight, as this graphic illustrates, with a client-side JavaScript MVC framework making AJAX calls to JAX-RS web services. The RESTful web services should run in a standard Java web container and not depend on Java EE server containers.

In order to do vector graphics and event handling for polylines and points independently from the base map, my map API abstraction layer must be replaced. Ideally, the replacement framework should be purely JavaScript and should not require any server-side changes, something like Leaflet.

MapViewer Components

MapViewer is much more than just a JavaScript framework for maps. It has several server-side components that support its client-side AJAX-based JavaScript API:

  • A core rendering engine Java library, SDOVIS, that performs cartographic rendering. A servlet exposes the rendering functions to Web applications.
  • Application programming interfaces for programming MapViewer features. These APIs include XML, Java, PL/SQL, and an AJAX-based JavaScript API.
  • A graphical Map Builder tool that enables you to create map symbols, define spatial data rendering rules, and create and edit MapViewer objects.
  • Oracle Maps, which includes map cache and FOI (feature of interest) servers that facilitate the development of interactive geospatial Web applications.

The MapViewer architecture is not targeted towards my ideal environment of simple Java web containers. The preferred environment is Oracle WebLogic or Glassfish.

That being said, MapViewer does support Tomcat, but to what extent I’ve yet to discover. The following table is from the Map Viewer J2EE Servers Support page:

J2EE Server Name and Version

 Oracle WebLogic Server  10g and Later
 GlassFish  3.1.2 or later
 Oracle Application Server  10g (10.1.3.x)
 WebLogic  9
 Oracle OC4J Standalone  10g (10.1.3.x)
 Apache Tomcat  6.x and Later
 WebSphere  6.x and 7.x
 JBoss  4.x and Later

This architecture is illustrated in this graphic from the Oracle Fusion Middleware MapViewer Primer.

mapviewerIn my current work environment, pools of servers support different domains of our site. There is nothing to say that one pool of servers cannot include Java EE servers to handle the mapping load. It would still serve to isolate the mapping services from other server pools as well reduce the workload on the other servers. The business justification for the new pool of mapping servers depends on how many MapViewer features add value to our site, things like dynamic heatmaps, for example.

I’ll start my deep dive with the tutorials that come with the project, and then will explore some of the extensive features list in MapViewer data sheet.

Installing a SSD for Faster GIS

vimg_about01

Running ESRI software is inevitable as I dive deeper into Geographic Information Systems. If I decide to get a Masters in GIS from the Penn State World Campus, then running ESRI ArcGIS is mandatory. That is a problem because my house is “Windows-free” and all ESRI software is Windows-only.

I did some searching and found that running ArcGIS on a Windows VM is not uncommon. The only gotcha I discovered is that you must turn off 3-D acceleration. I also learned that if I hold out long enough it’s rumored that a Mac version of ArcGIS may be coming.

To get the best possible performance with my existing computer I replaced my boot drive with a Samsung model 840 120 GB SSD for $99.99. Even though my computer is a bit long in the tooth, it should be able to run a Windows VM reasonably well, especially now that it has the SSD.

With the SSD Ubuntu boots incredibly fast! I shouldn’t have to replace my hardware for the foreseeable future, even when I do start running ArcGIS on a Windows VM.

Today was a good geek day.

Spatial Vector Acceleration in Oracle Spatial and Graph 12c

12c_logo

Dan Geringer, Senior Software Development Manager at Oracle, was on site this week working with our DBA, Tim Gerber, and they steered me towards documentation about the spatial vector acceleration available in 12c. The parameter is documented in the Oracle Spatial and Graph Developers Guide:

To accelerate the performance of spatial operators, it is recommended that you enable the Vector Performance Accelerator (VPA) feature by setting the SPATIAL_VECTOR_ACCELERATION database system parameter to the value TRUE.

Simply run the following command from a suitably privileged account.

SQL> ALTER SYSTEM SET SPATIAL_VECTOR_ACCELERATION=TRUE SCOPE=BOTH;
System altered.

ORA-65049: creation of local user or role is not allowed in CDB$ROOT

12c_logo

I really hate the response “RTFM” in the forums, but sadly it was appropriate in my case. Let me save you some grief when you start playing with 12c. If you do not need to use a CDB (container database) or PDB (pluggable database), then uncheck the “Create as Container database” check box during the installation.

Step5of9

If you leave that checked you will quickly learn that you can’t create a local user in the root container.

$ sqlplus sys as sysdba
SQL*Plus: Release 12.1.0.1.0 Production on Wed Jun 26 07:08:11 2013
Copyright (c) 1982, 2013, Oracle.  All rights reserved.

Enter password:
Connected to:
Oracle Database 12c Enterprise Edition Release 12.1.0.1.0 - 64bit Production
With the Partitioning, OLAP, Advanced Analytics and Real Application Testing options

SQL> GRANT DBA, CONNECT, RESOURCE TO STEVE IDENTIFIED BY dbl-secret-pwd;
GRANT DBA, CONNECT, RESOURCE TO STEVE IDENTIFIED BY dbl-secret-pwd
*
ERROR at line 1:
ORA-65049: creation of local user or role is not allowed in CDB$ROOT

Installing Oracle Spatial and Graph 12c on OEL 6.4

12c_logo

Oracle Spatial and Graph 12c has Arrived

Jean Ihm posted on Google+ today that Oracle Spatial and Graph 12c is available. This post is an update to my post earlier this month How to Install Oracle Spatial and Graph (11g) on OEL 6.4. Bear in mind that the context of my blog is a home spatial learning lab written by a Java developer, not a DBA, so please take what I say with a grain of salt.

Oracle 12c Gotcha

The Oracle 12c installation has “Create as Container database” checked by default. Container databases and PDB (Pluggable Database) didn’t exist in 11g and are a real paradigm shift. Unless you mean to add that complexity to your installation, be sure to uncheck the box circled in red below on the fifth screen show.

Complete the Pre-install Steps for Oracle Spatial and Graph 12c

To start out I cloned an Oracle VirtualBox snapshot I took of OEL 6.4 (Oracle Enterprise Linux) just prior to installing Oracle 11g. I performed the prerequisite steps as documented my 11g install post:

  1. Define the hostname.
  2. Install the dependencies. I didn’t find a 12c pre-install RPM for OEL, so I used the 11g RPM: oracle-rdbms-server-11gR2-preinstall.
  3. Change the secure Linux policy in /etc/selinux/config to permissive.

Install Oracle Spatial and Graph 12c

Download the two Linux zip files from the Oracle Spatial and Graph 12c page.

As root, create the directory shown below, and unzip both files into that directory.

# mkdir /home/OraDB12c/
$ cp [your path]/linuxamd64_12c_database_1of2.zip /home/OraDB12c/ 
$ cp [your path]/linuxamd64_12c_database_2of2.zip /home/OraDB12c/ 
$ cd /home/OraDB12c/ 
$ unzip linuxamd64_12c_database_1of2.zip
$ unzip linuxamd64_12c_database_2of2.zip

Add Permission for Oracle User to xhost

Next, to avoid a common display error during the Oracle 11g installation run the following command as root.

# xhost +SI:localuser:oracle 
  localuser:oracle being added to access control list

Edit /home/oracle/.bash_profile with your preferred editor and add the following environment variables (substituting your host name and other installation preferences).

# Oracle Settings
TMP=/tmp; export TMP
TMPDIR=$TMP; export TMPDIR

ORACLE_HOSTNAME=gps12c.localdomain 
ORACLE_UNQNAME=orcl 
ORACLE_BASE=/home/oracle/app/oracle
ORACLE_HOME=/home/oracle/app/oracle/product/12.1.0/dbhome_1
ORACLE_SID=orcl
export ORACLE_SID ORACLE_HOME ORACLE_BASE ORACLE_UNQNAME ORACLE_HOSTNAME
PATH=$ORACLE_HOME/bin:/usr/sbin:$PATH
export PATH
LD_LIBRARY_PATH=$ORACLE_HOME/lib:/lib:/usr/lib
CLASSPATH=$ORACLE_HOME/jlib:$ORACLE_HOME/rdbms/jlib; 
export CLASSPATH LD_LIBRARY_PATH

Switch to the oracle user and change to the OraDB12c directory to run the install.

# su - oracle
# cd /home/OraDB12c/database 
# ./runInstaller 

Since mine is a home machine I accepted the default values on most screens. I’ve included all the screenshots below.

Leave the first-page blank unless you have an Oracle Support account.

12c_2

This page is different from 11g. I skipped the software updates since I had none to install.

12c_3

This option will launch the database configuration assistant after the software is installed.

12c_4

A desktop class is sufficient for a home spatial learning lab.

12c_5

Be sure to deselect “Create as Container database” unless you need to manage PDB (Pluggable Databases). If you leave this op

Step5of9

Take the default inventory directory.

12c_7

With the three pre-install steps noted above, my system passed all the prerequisite checks and skipped directly to the summary page.

12c_8

Run the two scripts shown as root.

12c_11

Go have a cup of coffee. The database configuration takes awhile. When it’s complete the following window will appear.

12c_12

Test the Oracle Installation

Try connecting to the database while still signed in as the user oracle using the commands shown below. Run the test query shown to pull back the database SID.

$ sqlplus / as sysdba

SQL*Plus: Release 12.1.0.1.0 Production on Tue Jun 25 22:01:38 2013
Copyright (c) 1982, 2013, Oracle.  All rights reserved.

Connected to:
Oracle Database 12c Enterprise Edition Release 12.1.0.1.0 - 64bit Production
With the Partitioning, OLAP, Advanced Analytics and Real Application Testing options

SQL> select instance_name from v$instance;

INSTANCE_NAME
----------------
orcl

SQL> exit
Disconnected from Oracle Database 12c Enterprise Edition Release 12.1.0.1.0 - 64bit Production
With the Partitioning, OLAP, Advanced Analytics and Real Application Testing options

Wrapping Up

That is good enough for tonight. In my future posts, I’ll be using 12c instead of 11g, despite the fact that it will probably be a long while before we upgrade at work. I want access to the latest spatial features as I am learning.

How to Install Oracle MapViewer

MapViewerLogo

In this post, I cover how to install the Oracle MapViewer 11g (11.1.1.7) Quick Start Kit. I also tell you where to track down a copy of the data for the MapViewer demos (that is not included with this distribution), and I take you step-by-step through the import of that data and the creation of a permanent data source.

Download Oracle MapViewer

Go to the Software Downloads for Oracle Fusion Middleware MapViewer page and accept the Terms and Conditions. Download the MapViewer Quick Start Kit from the Current MapViewer Version section. The Quick start kit is bundled with Glassfish server version 3.1.2. Alternatively, you can download and unzip the EAR file and then deploy the WAR file from the EAR to Tomcat.

Unzip the file and read the README.txt file located in the mapviewer11g_gs directory.

Install and Configure Glassfish and MapViewer

Installation is simply a matter of following the instructions in the README.txt file.

$ ./runMeFirst.sh
Setting 'admin' user's password to: welcome1 ...
Command change-admin-password executed successfully.
Waiting for domain1 to start ......
Successfully started the domain : domain1
domain  Location: /home/smitchell/Applications/mapviewer11g_qs/glassfish3/glassfish/domains/domain1
Log File: /home/smitchell/Applications/mapviewer11g_qs/glassfish3/glassfish/domains/domain1/logs/server.log
Admin Port: 4848
Command start-domain executed successfully.
Deploying Oracle MapViewer ......
Application deployed with name mapviewer.
Command deploy executed successfully.
Deploying MapViewer Samples application ......
Application deployed with name mvdemo.
Command deploy executed successfully.
Enabling remote secure login
You must restart all running servers for the change in secure admin to take effect.
Command enable-secure-admin executed successfully.
Restarting server ...
Successfully restarted the domain
Command restart-domain executed successfully.
MapViewer QuickStart kit is now running!
MapViewer Server URL: http://localhost:8080/mapviewer
MapViewer Samples URL: http://localhost:8080/mvdemo
Glassfish Admin URL:  http://localhost:4848

Next, remove the one-time-use files used by runMeFirst.sh.

$ rm welcome1.txt 
$ rm password.txt 

MapViewer is now running. To start and stop Glassfish/MapViewer run the startServer and stopServer scripts.

Configure the MapViewer Demo

The MapViewer Quick Start Kit comes bundled with the MVDEMO war. There is some housekeeping necessary to set up the demo. That is all explained on the MVDEMO homepage: http://localhost:8080/mvdemo/.

Confirm the Required Database Views Exist

Numerous views should have been created in MDSYS when you installed Oracle Enterprise Edition.  Open SQL Developer and connect to the database. Scroll down to Other Users. Expand Other Users and find the user MDSYS. Expand the Views folder and scroll down until you come to the USER_SDO_… views (not shown). The following views should be there: USER_SDO_CACHED_MAPS, USER_SDO_MAPS, USER_SDO_THEMES, and USER_SDO_STYLES.

MDSYS_VIEWS

Note that the mcsdefinition.sql file is opened in the right side-panel above. That is a script that creates the necessary views should they be missing.

Import the MapViewer Demo Data

The data for the MapViewer demo is contained in a file named mvdemo.zip. That file is not part of maviewer11g_qs download. I found a copy in mapviewer10133wls.zip. It contains the mvdemo.zip file which, in turn, contains four SQL files, a mvdemo.dmp file, and readme.txt.

Follow the instructions in the file readme.txt included in mvdemo.zip. It walks you through the following steps.

Create new Oracle User

Create a new user, mvdemo. You’ll need that user later to import the demo data, although you may use a different user if you wish.

grant connect, resource, create view to mvdemo identified by mvdemo;
Grant succeeded.

Import the Dump Data

I’m working on two machines, so for this step, I first used secure copy to copy the dump data over to the Oracle database server.

 scp mvdemo.dmp oracle@gps11g:~/
oracle@gps11g's password:
mvdemo.dmp                                      100%  8288KB    8.1MB/s    00:00

From the oracle user account on the database server I ran the import command:

$ imp mvdemo/mvdemo file=mvdemo.dmp full=y ignore=y

Import: Release 11.2.0.1.0 - Production on Sun Jun 9 19:43:47 2013
Copyright (c) 1982, 2009, Oracle and/or its affiliates.  All rights reserved.

Connected to: Oracle Database 11g Enterprise Edition Release 11.2.0.1.0 - 64bit Production
With the Partitioning, OLAP, Data Mining and Real Application Testing options

Export file created by EXPORT:V09.00.01 via conventional path
import done in US7ASCII character set and AL16UTF16 NCHAR character set
import server uses WE8MSWIN1252 character set (possible charset conversion)
export client uses WE8MSWIN1252 character set (possible charset conversion)
. importing MVDEMO's objects into MVDEMO
. . importing table                       "CITIES"        195 rows imported
. . importing table                     "COUNTIES"       3230 rows imported
. . importing table                    "EMPLOYEES"         14 rows imported
. . importing table                  "INTERSTATES"        239 rows imported
. . importing table                         "MAPS"          4 rows imported
. . importing table                       "STATES"         56 rows imported
. . importing table                       "STYLES"        285 rows imported
. . importing table                  "TERRITORIES"          9 rows imported
. . importing table                "TERR_COUNTIES"       3230 rows imported
. . importing table                       "THEMES"         10 rows imported
Import terminated successfully without warnings.

Run mvdemo.sql

Readme.txt suggests importing mvdemo.sql from SQL*PLUS; however, I did it from SQL Developer using a new connection authenticated with the new mvdemo user account.

sqldemo_import

That completes the mvdemo data import.

Create the mvdemo Data Source

Open the MapViewer Administrative console, http://localhost:8080/mapviewer/, and click the Admin link that I circled in red below.

MapViewerAdmin

Follow these steps:

  1. Sign in with the Glassfish Id and password, admin/welcome1. You may change the Glassfish password by running the resetPassword.sh script.
  2. When the Management page appears click Configuration at the top of the menu on the left side of the page.
  3. The MapperConfig file will be displayed. Scroll to the bottom of the file to the Predefined Data Sources section.
  4. Un-comment the mvdemo map_data_source and edit the values to match the database server as shown below. NOTE: the exclamation point in front of the password is not a typo. It must be there.
  5. Click the Save and Restart button at the bottom of the Configuration page.

datasource

Click on the Data sources menu below the Configuration menu after the MapViewer restarts and you’ll see the new data source.

mvdemo_ds

Explore the Demos

You can now start exploring the demos at http://localhost:8080/mvdemo/demo/oracle_maps_demo.jsp.

demopage

In my next post I’ll set up the HTML5 demos, that is, once I’ve finished exploring this demo set.

Installing Oracle SQL Developer

sqldevlogo

This  short post covers the installation of Oracle SQL Developer and the IP tables change required on OEL 6.4 to open up port 1521 so SQL Developer can connect to the Oracle database.

The illustration below from my earlier post, Host to Install OEL 6.4 as a VirtualBox Guest, shows that I run my Oracle 11g Enterprise Edition spatial learning lab on VirtualBox, but my tools run on the host OS, Ubuntu:

SpatialLab

Configure the Hosts File

Add the host name of the Oracle database server to /etc/hosts on the machine running SQL Developer.

hosts

Open Port 1521

SQL Developer needs to connect to the TNS listener on the Oracle database server over port 1521 (or some other configured port), so Linux needs to accept traffic on port 1521. Use Telnet to test whether the port is open on the database server. From the machine running SQL Developer issue the following command substituting your Oracle database server host name and listener port.

$ telnet gps11g 1521
Trying 192.168.1.39...
telnet: Unable to connect to remote host: No route to host

If telnet cannot get through on that port check the /etc/sysconfig/iptables file on the Oracle database server.  Confirm that port 1521 is open. I had to add the rule outlined in red. Please talk to your Systems Administrator about the risks of making this change. My house is behind a firewall appliance and port 1521 is blocked to the outside world, so I felt secure making this change.

iptables

If you make changes to /etc/sysconfig/iptables run the following command to restart iptables afterwards:

$ /etc/init.d/iptables restart
iptables: Flushing firewall rules:                         [  OK  ]
iptables: Setting chains to policy ACCEPT: filter          [  OK  ]
iptables: Unloading modules:                               [  OK  ]
iptables: Applying firewall rules:                         [  OK  ]

Download SQL Developer

Download SQL Developer from here: http://www.oracle.com/technetwork/developer-tools/sql-developer/downloads/index.html. Pick the appropriate distribution for your system. For OEL 6.4 that is Other Platforms.

sqldev-download

Install SQL Developer

The installation itself is very well documented here: https://forums.oracle.com/forums/thread.jspa?threadID=2302774. Follow the instructions found on that page to install SQL Developer.

The SQL Developer software requires Java. The link above includes a step where you have to add the Java installation location to a configuration file. I’ve had to do that in the past on other machines, but I did not have to do that on this machine. Since I’m a Java developer and need to use an older Sun distribution of Java for compatibility reasons I did a separate set-up step not mentioned before in my blog. That included added JAVA_HOME to my .bashrc file.

Add a Database Connection

After installing and launching SQL Developer click the green plus sign to add a new database connection:

sqldevadd

Supply the information displayed when the TNS Listener was started.

db_connection

Connect to the Oracle Database Server

As long as your database is started, your listener is listening to port 1521, and iptables allows traffic on port 1521 you should now be able to connect to the SPATIAL_LEARNING database.

db_data

In my next post, I will setup Oracle Map Viewer.

Getting Started with Oracle Spatial using SQL*PLUS

SQLPLUS

In my previous post, How to Install Oracle Spatial and Graph on OEL 6.4, I showed how to install Oracle 11g Enterprise Edition. In this post, I show how to use SQL*PLUS to create a test user account, and how to create a spatially indexed table into which the path of the Kansas Speedway is inserted. Finally, I show a couple of very simple spatial queries.

GoogleMapsEngine

Start the Database

Recapping from my last post, you should now be able to start your Oracle 11g EE database using SQL*PLUS.

$ su - oracle
Password:
$ sqlplus sys as sysdba

SQL*Plus: Release 11.2.0.1.0 Production on Mon Jun 3 19:59:35 2013
Copyright (c) 1982, 2009, Oracle. All rights reserved.
Enter password:
Connected to an idle instance.

SQL> startup
ORACLE instance started.

Create a New Oracle User

Before signing out of SQL*PLUS create a new Oracle user account. Here you see that I created a user named STEVE and granted that account the privileges of DBA, CONNECT, and RESOURCE.

SQL> GRANT DBA, CONNECT, RESOURCE TO STEVE IDENTIFIED BY nHMdfGcg0aTt;
Grant succeeded.
SQL> exit

Exit SQL*PLUS after creating the new user.

Start the TNS Listener

The TNS listener needs to be started before signing in as the new user. From the oracle Linux account execute the following command:

$ lsnrctl start

When the listener starts its output will look something like this:

LSNRCTL for Linux: Version 11.2.0.1.0 - Production on 07-JUN-2013 17:59:40

Copyright (c) 1991, 2009, Oracle.  All rights reserved.

Starting /home/oracle/app/oracle/product/11.2.0/dbhome_1/bin/tnslsnr: please wait...

TNSLSNR for Linux: Version 11.2.0.1.0 - Production
System parameter file is /home/oracle/app/oracle/product/11.2.0/dbhome_1/network/admin/listener.ora
Log messages written to /home/oracle/app/oracle/diag/tnslsnr/gps11g/listener/alert/log.xml
Listening on: (DESCRIPTION=(ADDRESS=(PROTOCOL=ipc)(KEY=EXTPROC1521)))
Listening on: (DESCRIPTION=(ADDRESS=(PROTOCOL=tcp)(HOST=gps11g)(PORT=1521)))

Connecting to (DESCRIPTION=(ADDRESS=(PROTOCOL=IPC)(KEY=EXTPROC1521)))
STATUS of the LISTENER
------------------------
Alias                     LISTENER
Version                   TNSLSNR for Linux: Version 11.2.0.1.0 - Production
Start Date                07-JUN-2013 17:59:42
Uptime                    0 days 0 hr. 0 min. 0 sec
Trace Level               off
Security                  ON: Local OS Authentication
SNMP                      OFF
Listener Parameter File   /home/oracle/app/oracle/product/11.2.0/dbhome_1/network/admin/listener.ora
Listener Log File         /home/oracle/app/oracle/diag/tnslsnr/gps11g/listener/alert/log.xml
Listening Endpoints Summary...
  (DESCRIPTION=(ADDRESS=(PROTOCOL=ipc)(KEY=EXTPROC1521)))
  (DESCRIPTION=(ADDRESS=(PROTOCOL=tcp)(HOST=gps11g)(PORT=1521)))
The listener supports no services
The command completed successfully

Create and Index the Spatial Table

For the purpose of this post all that is needed is a very simple table. No need to won’t worry about primary keys, sequences, nor constraints.

The SQL below does three things:

  1. Defines a table containing a spatial column.
  2. Inserts spatial metadata for the table.
  3. Creates a spatial index on the spatial column.

Sign in using the new user account and run the SQL shown below.

$ sqlplus STEVE@orcl

SQL*Plus: Release 11.2.0.1.0 Production on Fri Jun 7 18:08:22 2013

Copyright (c) 1982, 2009, Oracle.  All rights reserved.

Enter password: 

Connected to:
Oracle Database 11g Enterprise Edition Release 11.2.0.1.0 - 64bit Production
With the Partitioning, OLAP, Data Mining and Real Application Testing options

SQL> CREATE TABLE SPATIAL_LEARNING (
    SPATIAL_NAME VARCHAR2(50) NOT NULL,
    SPATIAL_DATA SDO_GEOMETRY NOT NULL);
Table created.

SQL> INSERT INTO USER_SDO_GEOM_METADATA
    (TABLE_NAME,
     COLUMN_NAME,
     DIMINFO,
     SRID)
  VALUES (
  'SPATIAL_LEARNING',
  'SPATIAL_DATA',
  SDO_DIM_ARRAY( 
    mdsys.sdo_dim_element('longitude',-180,180,0.05), 
    mdsys.sdo_dim_element ('latitude',-90,90,0.05)
     ),
  8307
);  
1 row created.

SQL> CREATE INDEX SPATIAL_LEARNING_DATA_IDX
ON SPATIAL_LEARNING (SPATIAL_DATA) 
INDEXTYPE IS MDSYS.SPATIAL_INDEX;  
Index created.

Let’s review the code above.

Create Table with SDO_GEOMETRY Data Type

The SPATIAL_DATA column of the SPATIAL_LEARNING table is defined with the SDO_GEOMETRY data type. That’s the column where the spatial data will be stored. The SDO_GEOMETRY type is discussed in more detail below.

Spatial Metadata

Spatial metadata is defined in the USER_SDO_GEOM_METADATA table. The metadata describes the dimensions, upper and lower bounds, and the tolerance of the spatial data. In this case, we declare that the SPATIAL_DATA column has two dimensions: “latitude” and “longitude.” The upper and lower bounds of  latitude are -90 through 90.  The upper and lower bounds of longitude are -180 through 180. The points stored in the SPATIAL_DATA column have a tolerance of 0.05, meaning they can be as close as 5 cm apart. Finally, the SRID (Spatial Reference System Identifier) is 8307.

Spatial Index

Once the spatial metadata is defined an index may be created using the MDSYS.SPATIAL_INDEX type.

Understanding SDO_GEOMETRY

Let’s get familiar with the SDO_GEOMETRY type before inserting the data. Here is its definition which shows its component parts.

CREATE TYPE sdo_geometry AS OBJECT (
 SDO_GTYPE NUMBER, 
 SDO_SRID NUMBER,
 SDO_POINT SDO_POINT_TYPE,
 SDO_ELEM_INFO SDO_ELEM_INFO_ARRAY,
 SDO_ORDINATES SDO_ORDINATE_ARRAY);

See the Spatial Data Types and Metadata section on SDO_GEOMETRY for complete reference information. Let’s take a moment to go over the SDO_GEOMETRY information pertinent to the test data used in this post.

SDO_GTYPE

The SDO_GTYPE tells oracle what kind of data the SDO_GEOMETRY object contains. The test data includes 2003, polygon, and 2001, point.

Here are some of the SDO_GTYPES:

  • Point:   2001 (2D), 3001 (3D)
  • Line : 2002 (2D), 3002 (3D)
  • Polygon:  2003 (2D),  3003 (3D)
  • Collection: 2004 (2D), 3004 (3D)
  • Multipoint: 2005(2D), 3005 (3D)
  • Multiline: 2006(2D), 3006 (3D)
  • Multipolyline: 2007(2D), 3006 (3D)

SDO_SRID

The SDO_SRID  (Spatial Reference System Identifier)  for the test data is 8307, the WGS-84 type for a latitude and longitude coordinate system.  More about SRID types can be found in the introduction to coordinate reference systems.

SDO_POINT

Single points can be declared with the SDO_POINT_TYPE, in which case the remaining attributes of SDO_GEOMETRY are left null. Do not use the SDO_POINT_TYPE if you are using Oracle LRS (Linear Reference System).  The SDO_POINT_TYPE is used below for the points in the speedway infield and out in the parking lot. SDO_POINT is null for the speedway track polygon because it uses SDO_ELEMENT_INFO and SDO_ORDINATES instead.

SDO_ELEMENT_INFO

To use SDO_ORDINATES set SDO_POINT to null and define SDO_ELEM_INFO. SDO_ELEM_INFO is the metadata for the elements in the subsequent SDO_ORDINATES array. The SDO_ELEM_INFO is declared using  SDO_ELEM_INFO_ARRAY. It takes three arguments:

  1. Ordinate Starting Offset – The offset into the ordinate array at which to start.
  2. Element Type – The type of ordinates. For example:
    • 1003: exterior polygon ring (must be specified in counterclockwise order)
    • 2003: interior polygon ring (must be specified in clockwise order)
  3. Interpretation – If the element type is a compound type, then this column specifies how many subsequent triplet values are part of the element, otherwise, it specifies whether to connect the ordinates by straight lines or arcs.

SDO_ORDINATES – The SDO_ORDINATES is an array of coordinate values. For a 2D line, the array would contain “long, lat, long, lat,, …”  For a 3D SRID the array would contain (long, lat, elevation, long, lat, elevation, …). Note there is no delimiter separating ordinates for one element from another. That is why the preceding element info declaration is so important. It tells Oracle how to group the ordinates together into elements.

Insert the Spatial Test Data

You are now ready to insert three rows into our SPATIAL_LEARNING table:

  1. An interior polygon ring tracing the track at the Kansas Speedway.
  2. A single point in the infield.
  3. A single point in a parking lot outside the speedway.

Insert the Speedway Track Polygon

Use the following insert statement to store the polygon representing the oval track at the Kansas Speedway. 1003 in the SDO_ELEM_INFO_ARRAY indicates an exterior polygon ring, and the 1 says to connect the elements with straight lines. Also note, the first and last points are identical, thus closing the ring.

SQL> INSERT INTO SPATIAL_LEARNING 
(SPATIAL_NAME, SPATIAL_DATA)
VALUES
( 'Kansas Speedway Track',
  SDO_GEOMETRY(
    2003, -- two-dimensional polygon
    8307, -- SRID for WGS-84 longitude/latitude 
    NULL,
    SDO_ELEM_INFO_ARRAY(1, 1003, 1),
    SDO_ORDINATE_ARRAY(
        -94.8338234424591,39.11655560213989,
        -94.83394682407379,39.11618478057385,
        -94.83402192592621,39.11574920989278,
        -94.83404874801636,39.11532540880791,
        -94.83400046825409,39.114819198615976,
        -94.83385562896729,39.11417171516305,
        -94.83353912830353,39.11296502557993,
        -94.83324944972992,39.11248823034213,
        -94.8328846693039,39.11213504660467,
        -94.83245015144348,39.11187604407223,
        -94.83188152313232,39.1116700186508,
        -94.8313558101654,39.1115581760269,
        -94.8308676481247,39.11156994894302,
        -94.83044385910034,39.111611154134025,
        -94.82995569705963,39.111711223783246,
        -94.82944071292877,39.111934908367736,
        -94.82903838157654,39.11224688831305,
        -94.82870578765869,39.11257652599992,
        -94.82847511768341,39.11292382118056,
        -94.82679605484009,39.11707357185418,
        -94.82670485973358,39.117479704535015,
        -94.82674241065979,39.118021211134604,
        -94.8269248008728,39.11850974069151,
        -94.82704818248749,39.118739289554505,
        -94.82735931873322,39.119121869330876,
        -94.82782065868378,39.119427931656176,
        -94.82835710048676,39.11965747752762,
        -94.8288881778717,39.119781078840944,
        -94.82943534851074,39.11981639346204,
        -94.82993960380554,39.11977519306902,
        -94.83050286769867,39.11964570596266,
        -94.83092129230499,39.119422045854755,
        -94.83125925064087,39.11921015667656,
        -94.83244478702545,39.11835670770069,
        -94.8330295085907,39.11783874741924,
        -94.83343183994293,39.11730901137464,
        -94.83371078968048,39.11684401756424,
        -94.8338234424591,39.11655560213989
     ) 
  ) 
); 
1 row created.

Insert a point in the Speedway Parking Lot

Next use the SDO_POINT_TYPE to define a nearby point in the speedway parking lot.

INSERT INTO SPATIAL_LEARNING (SPATIAL_NAME, SPATIAL_DATA) VALUES 
( 'Kansas Speedway Parking', 
  SDO_GEOMETRY( 
     2001,
     8307, 
     SDO_POINT_TYPE(-94.837115, 39.1174003, null),
     null, 
     null 
  ) 
); 

Insert a point in the Speedway Infield

Use another SDO_POINT_TYPE to define a point within the speedway infield.

INSERT INTO SPATIAL_LEARNING (SPATIAL_NAME, SPATIAL_DATA) VALUES 
( 'Kansas Speedway Infield', 
  SDO_GEOMETRY( 2001,
     8307,
     SDO_POINT_TYPE(-94.8312053, 39.1153637, null), 
     null, 
     null 
   ) 
);

Run a Simple Spatial Query

You are now ready to query the spatial data.  These examples use SDO_FILTER to select geometry falling within the bounds of a rectangular specified by the lower left and upper right coordinates. The first rectangle is a park in Monterrey, Mexico. The second rectangle that encloses the speedway. Running the first query should not return any result. The second query returns all three rows of the SPATIAL_LEARNING table.

SQL> SELECT t1.SPATIAL_NAME 
FROM SPATIAL_LEARNING t1 
WHERE SDO_FILTER(
  t1.SPATIAL_DATA,
  SDO_GEOMETRY(
   2001, 8307, NULL,
   SDO_ELEM_INFO_ARRAY(1,1003,3),
   SDO_ORDINATE_ARRAY(
     -100.347404, 25.762179, 
     -100.336082, 25.775009
   )
  )
) = 'TRUE';

no rows selected

SQL> SELECT t1.SPATIAL_NAME 
FROM SPATIAL_LEARNING t1 
WHERE SDO_FILTER(
  t1.SPATIAL_DATA,
  SDO_GEOMETRY(
   2001, 8307, NULL,
   SDO_ELEM_INFO_ARRAY(1,1003,3),
   SDO_ORDINATE_ARRAY(
     -94.852695, 39.106554, 
     -94.816046, 39.124068
   )
  )
) = 'TRUE';

SPATIAL_NAME
--------------------------------------------------
Kansas Speedway Track
Kansas Speedway Infield
Kansas Speedway Parking

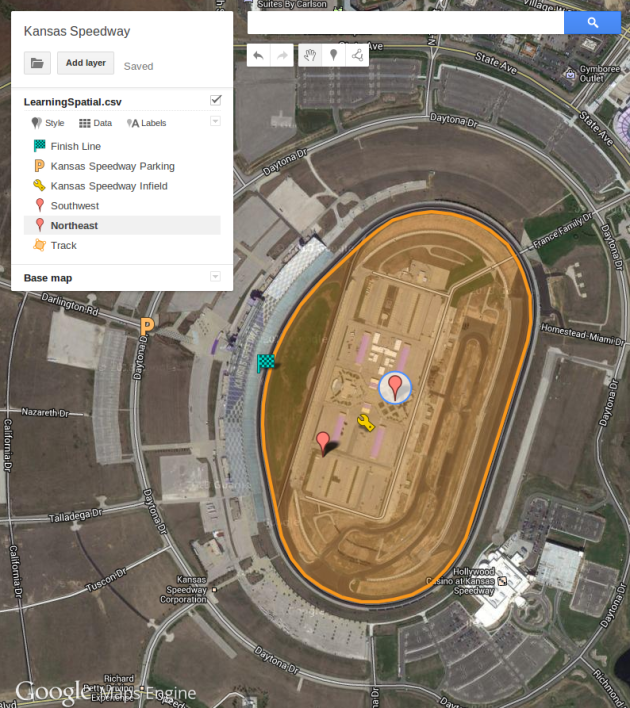
One mystery remains, the following query is an SDO_FILTER using a rectangle enclosing the infield track point. The southwest and northeast corners of the rectangle are marked on the Google MapsEngine map pictured at the beginning of this post. Click on the map image open the map in Google MapsEngine.

I expected it to return only the infield point, but it also returns the track’s polygon, perhaps because the rectangle is in the interior area of the polygon. I’ll try to track down the answer.

SQL> SELECT t1.SPATIAL_NAME 
FROM SPATIAL_LEARNING t1 
WHERE SDO_FILTER(
  t1.SPATIAL_DATA,
  SDO_GEOMETRY(
   2001, 8307, NULL,
   SDO_ELEM_INFO_ARRAY(1,1003,3),
   SDO_ORDINATE_ARRAY(
     -94.832375, 39.1146286, 
     -94.8304224, 39.1158106
   )
  )
) = 'TRUE';

SPATIAL_NAME
--------------------------------------------------
Kansas Speedway Track
Kansas Speedway Infield

There are many spatial operators and functions to be explored in future posts, but our next post will discuss installing additional Oracle tools: SQL Developer and Map Viewer.
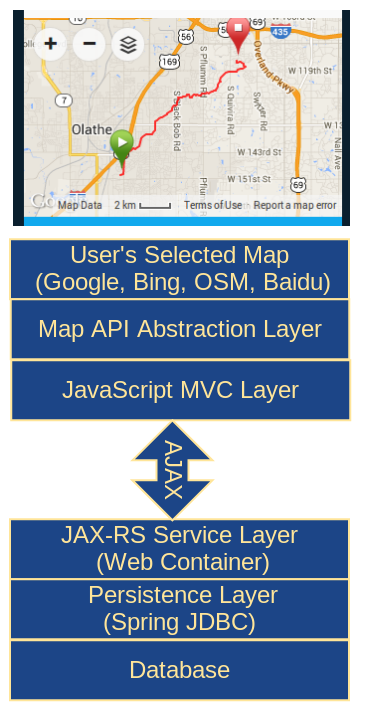
How to Install Oracle Spatial and Graph on OEL 6.4

logo

In my previous post, How to Install OEL 6.4 as a VirtualBox Guest, we got Oracle Linux up and running on VirtualBox. In this post, we continue with the Oracle database. Installing Oracle on Linux can be frustrating if you don’t do all the necessary pre-installation steps, but with the right preparation, it’s a piece of cake.

Audience

Damn it, Jim, I’m a software engineer, not a systems administrator!

This post is for developers who want to learn about Oracle Spatial and Graph. It assumes that you are comfortable using Linux and that you are familiar with RDBMS software. Many of the steps in this post are done at a Linux command prompt. This post looks long because I included all the screenshots, but in reality ,there are not that many steps to perform.

Let’s Get Started

Oracle Spatial and Graph is built into Oracle Database Enterprise Edition. It is not part of the Standard Edition. At the time of this writing Oracle 12c has not been released, so we’ll be using 11g. I’ll do an addendum post when 12c is available. Most of what you need to know about installing Oracle 11g Enterprise Edition on Oracle Enterprise Linux 6.4 can be found at the following link. Take a moment to browse that article and search for some of the other installation instructions that are out there.

http://www.oracle-base.com/articles/11g/oracle-db-11gr2-installation-on-oracle-linux-6.php

The remained of this post shows the steps that worked for me following the post above and other web resources.

Preparing the OS for 11g

There are a number of steps necessary to prepare for the Oracle installation, including setting up the hosts file, installing dependency libraries, adding the oracle user and group, adding directories, defining environment variables and changing the SELINUX permission. Much of this work is handled by a pre-installation package released by Oracle. If you do all the prep work correctly the database installation is straightforward. I had a few false starts because of missing some of the prerequisites described below.

Host Name

Use the hostname command to check your hostname. If you want to change it, now is the time. Whether or not you change the name, make sure that the system hostname is correctly defined in /etc/hosts/ for the loopback test during the database installation.

Edit the /etc/sysconfig/network file as the root user if you want to switch the host name   Set the HOSTNAME property to the desired name.

NETWORKING=yes
HOSTNAME=gps11g.localdomain

Be sure that the hostname is defined in the /etc/hosts file. I’m using a static IP address, so that is what I put in the hosts file. If you are using DHCP then add the host name to the first two lines instead.

127.0.0.1    localhost localhost.localdomain
::1          localhost localhost.localdomain
192.168.1.39 gps11g gps11g.localdomain 

Installing Library Dependencies

There are numerous library dependencies that must be installed to support 11g on OEL 6.4. Oracle released an RPM package that takes care of these for you, as well as creates the oracle user and home directory. The RPM is documented here:

http://www.oracle.com/technetwork/articles/servers-storage-admin/ginnydbinstallonlinux6-1845247.html

Switch to the root account and run the command below to install the preinstall package.

# su - root
# yum install oracle-rdbms-server-11gR2-preinstall 
  ... 
  Complete!

When that completes, do a full update just for good measure.

# yum update 

Assign a password to the oracle user.

# passwd oracle 

Change the secure Linux policy in /etc/selinux/config to permissive. Do not change any another setting in the file. I emphasize the point because I carelessly changed the wrong property which caused a kernel panic after I rebooted.  

# This file controls the state of SELinux on the system.
# SELINUX= can take one of these three values:
#     enforcing - SELinux security policy is enforced.
#     permissive - SELinux prints warnings instead of enforcing.
#     disabled - No SELinux policy is loaded.
SELINUX=permissive
# SELINUXTYPE= can take one of these two values:
#     targeted - Targeted processes are protected,
#     mls - Multi Level Security protection.
SELINUXTYPE=targeted

Reboot the server after completing this change.

Install Oracle Enterprise Edition 11g

Download the two installation zip files for Oracle EE 11g: http://www.oracle.com/technetwork/database/enterprise-edition/downloads/112010-linx8664soft-100572.html.
As root, create the directory shown below, and unzip both files into that directory.

# mkdir /home/OraDB11g/
# cp [your path]/linux.x64_11gR2_database_1of2.zip /home/OraDB11g/ 
# cp [your path]/linux.x64_11gR2_database_2of2.zip /home/OraDB11g/ 
# cd /home/OraDB11g/ 
# unzip linux.x64_11gR2_database_1of2.zip 
# unzip linux.x64_11gR2_database_2of2.zip

Add Permission for Oracle User to xhost

Next, to avoid a common display error during the Oracle 11g installation run the following command as root.

# xhost +SI:localuser:oracle 
  localuser:oracle being added to access control list

Edit /home/oracle/.bash_profile with your preferred editor and add the following environment variables.

# Oracle Settings
TMP=/tmp; export TMP
TMPDIR=$TMP; export TMPDIR

ORACLE_HOSTNAME=gps11g.localdomain 
ORACLE_UNQNAME=orcl 
ORACLE_BASE=/home/oracle/app/oracle
ORACLE_HOME=/home/oracle/app/oracle/product/11.2.0/dbhome_1
ORACLE_SID=orcl
export ORACLE_SID ORACLE_HOME ORACLE_BASE ORACLE_UNQNAME ORACLE_HOSTNAME
PATH=$ORACLE_HOME/bin:/usr/sbin:$PATH
export PATH
LD_LIBRARY_PATH=$ORACLE_HOME/lib:/lib:/usr/lib
CLASSPATH=$ORACLE_HOME/jlib:$ORACLE_HOME/rdbms/jlib; 
export CLASSPATH LD_LIBRARY_PATH

Switch to the oracle user and change to the OraDB11g directory to run the install.

# su - oracle
# cd /home/OraDB11g/database 
# ./runInstaller 

Once the installer opens you will be presented with the screens below. Since we are building an instance just for learning you may simply accept the default values on most screens. Leave the first-page blank unless you have an Oracle Support account.

db1

Select the option to create and configure a database.

db2

Choose Desktop Class on the next page.

db3

Provide an administrative password, and accept the default values in the other fields.

db4

Use the default inventory location.

db5

Despite having installed the prerequisite RPM provided by Oracle, you will still be warned of missing packages. I did a little digging, and in my case, it said I was missing libaio-0.3.105, but my system had libaio-0.3.107. I selected the “Ignore All” option at the top of the page and continued.

db6

When the summary page appears, click Save Response File to keep a record of what is being installed on your system and then continue.

db7

Now is a good time to go get some coffee. The installation will run for awhile.

db8

If you picked the configure database option on the second page then next you will see the configuration assistant launch. This too will run for quite awhile.

db9

When the configure assistant finishes you will see this page showing your database SID and other information.

db10

The final step is to switch back to root and run the two scripts shown.

db11

The final page provides the Enterprise Manager Database Control URL.

db12

Test the Oracle Installation

Try connecting to the database while still signed in as the user oracle using the commands shown below. Run the test query shown to pull back the database SID.

$ sqlplus / as sysdba

SQL*Plus: Release 11.2.0.1.0 Production on Sat Jun 1 10:30:44 2013

Copyright (c) 1982, 2009, Oracle.  All rights reserved.

Connected to:
Oracle Database 11g Enterprise Edition Release 11.2.0.1.0 - 64bit Production
With the Partitioning, OLAP, Data Mining and Real Application Testing options

SQL> select instance_name from v$instance;

INSTANCE_NAME
----------------
orcl

SQL> exit
Disconnected from Oracle Database 11g Enterprise Edition Release 11.2.0.1.0 - 64bit Production
With the Partitioning, OLAP, Data Mining and Real Application Testing options

Starting Oracle

With no further changes, Oracle will not start automatically after a reboot. The example below shows how to start Oracle from SQLPLUS using the startup command. You can shutdown Oracle from SQLPLUS with the shutdown command.

# su - oracle

# sqlplus /nolog

SQL*Plus: Release 11.2.0.1.0 Production on Sat Jun 1 13:12:36 2013

Copyright (c) 1982, 2009, Oracle.  All rights reserved.

SQL> connect / as sysdba
Connected to an idle instance.
SQL> startup
ORACLE instance started.

Total System Global Area  776646656 bytes
Fixed Size            2217384 bytes
Variable Size          482347608 bytes
Database Buffers      289406976 bytes
Redo Buffers            2674688 bytes
Database mounted.
Database opened.
SQL>

Automating Restart

Setting up the automatic restart of Oracle is beyond the scope of this post. Instructions can be found here:

http://docs.oracle.com/cd/E11882_01/server.112/e25494/restart.htm#BABGIGDB

What’s Next

In my next post, we’ll set-up SQL Developer and Oracle Map Viewer and test out some basic spatial SQL.

Diving Deeper into Oracle Spatial and Graph

Recently I attended the 2013 Location Intelligence and Oracle Spatial and Graph Users Conference in Washington, D.C. Compared with the Google I/O, JavaOne and LotusSphere conferences that I have attended in the past this was tiny, a couple of hundred attendees instead of thousands. It was similar in size to a WebSphere Portal conference I attended in Baltimore. The small size affords greater access to experts and fosters an openness in the sessions not found at mega-conferences. It’s a much better experience, in my opinion.

I’ve been working with Oracle Spatial at Garmin, where I work as a software engineer on the Garmin Connect website. Garmin Connect is part of the Fitness division and is a repository for GPS data uploaded from the users’ fitness devices for running, cycling, and swimming. Below is an example of a Connect page used to plan routes. In this example, I was planning a run during my stay in Washington, D.C. I used the heat map overlay to find a route frequented by other runners. This is helpful when you are running or biking in an unfamiliar area. This is just one example of how Connect presents geospatial information to our users.

Course Creator with heat maps turned on.

Course Creator with heat maps turned on.

The Location Intelligence and Oracle Spatial and Graph Users Conference showed me how many more features exist in Oracle Spatial and Graph that we are not taking advantage of today. I came home determined to expand my knowledge of Oracle Spatial and Graph and to find new ways to leverage this exciting technology at Garmin.

This blog is my personal journal to look back upon to help me remember what I’ve learned along the way. Perhaps it will prove helpful to others on a similar path.